This is a guide for setting up an Apple Mac OS X workstation with SSH key-based authentication to a remote FreeBSD server. I won’t go into any detail about these protocols or try to make a case for using them. If you’re reading this, you probably already have a basic grounding on SSH, SFTP and the implications of SSH key-based authentication. My goal is to outline the steps needed so you can start using key-based authentication on your Mac.
I. Intended audience
The instructions here are aimed at Mac OS X based web developers with at least a moderate level of systems administration knowledge. Most likely you host websites for your clients or employer on *nix servers controlled through a command line interface. You generally work on multiple servers per project. Repeatedly entering secure long random passwords is becoming a hassle. If this sounds familiar, this guide is for you.
I’m on a Mac OS X workstation, currently Yosemite, using the Mac Terminal App to connect via SSH and Panic’s Transmit FTP client to transfer files. The server instructions here are for FreeBSD but you should still find the information useful if you run a Linux-based web server. I expect that you’re familiar with your own environment and have a preferred way of doing things so won’t list every command needed.
The prerequisites for this guide are that you:
- already have your server set up to SSH and SFTP with password authentication;
- have an account on the server that you use for day-to-day web development;
- also have root access to the server.
II. Setting up your Mac workstation and server for SSH Key-Based Authentication
We’ll need to do two main things to get everything working:
- Set up your server to accept the key files instead of a password.
- Configure your Mac OS X workstation to use SSH key files.
We’ll be moving back-and-forth between the them so for clarity, open up two terminal windows: one will be used for configuring the server, which I’ll refer to as your server terminal and another for configuring your Mac workstation, which I’ll call the Mac terminal.
A. Configure the server
First make sure your server is configured to accept key-based authentication. On the server terminal, open a secure shell to the server as you normally would. Edit the configuration file for your OpenSSH Daemon at /etc/ssh/sshd_config.
Look for the following lines and uncomment or add them:
PubkeyAuthentication yes
AuthorizedKeysFile .ssh/authorized_keys
ChallengeResponseAuthentication no
You may need to return to this file later but for now, save it and restart sshd. On FreeBSD, it’s the command:
B. Generate the key files on your Mac
Now you need to generate your private and public SSH key files. The private key file will remain on your Mac and you’ll place a copy of the public key file on the server. To generate the key files, switch to your Mac terminal and run:
The -t flag specifies that you’re creating an RSA key.
You’ll be asked to enter a file name for the key. The default for key files on Mac OS X is /Users/username/.ssh/id_rsa.pub. While you can simply select the default, it might be a good idea to create a key file specifically for each project. That way, if your Mac workstation is ever compromised, you minimise the risk of access to servers used for past projects where your account has been inadvertently left active.
ssh-keygen will also ask if you want to set a password for the key. If you set a password, you’ll have to enter it every time you try to authenticate with the key file. 1
The result should be two new key files in your .ssh directory:
- The public key: /Users/username/.ssh/yourkeyfile_rsa.pub
- The private key: /Users/username/.ssh/yourkeyfile_rsa
If you use a service like GitHub you may also see your GitHub key files already in that directory.
C. Copy the public key to the server
Transfer your public key to the .ssh directory of the server account you use to do your day-to-day web development. There are two ways to do this on a standard-install Mac OS X workstation. You can follow these steps:
- Go to the server terminal and cd into the account’s home directory.
- Create a .ssh directory (~/.ssh/).
- Switch back to the Mac’s terminal and copy the public key text using the command:
$ pbcopy < ~/.ssh/yourkeyfile_rsa.pub
- Move back to the server terminal and create an authorized_keys file within the .ssh directory.
- Paste the public key text into your authorized_keys file. (Remember that the pbpaste command won’t work on a non-Mac operating system.)
Alternatively, you can run the following command on your Mac’s terminal:
However it’s done, you should end up with a file ~/.ssh/authorized_keys for the developer account on the server.
It’s worth making this clear so there’s no confusion: you are giving the public key, yourkeyfile_rsa.pub, to the developer account that you’d previously been using to connect using a password. You should not be giving it to the root account. Make sure you put the authorized_keys file in the developer account’s home folder. Also make sure you don’t accidentally copy and paste the private key, yourkeyfile_rsa.
D. Test authentication to the remote server over SSH
Make sure everything worked by checking if you can connect to the server without having to supply a password. Log out of your existing connection on the server terminal and try connecting again:
The -i flag should be the path to the private key file we generated in step B. Also, if you set a key password, you will be asked to supply it before you can access the key.
You should see your server motd and terminal prompt after pressing enter.
E. Optional: disable password authentication
Since you’ve gone to the trouble of setting up SSH key-based authentication, you may want to disable password authentication after you’ve successfully testing the connection. Uncomment or add the following lines in /etc/ssh/sshd_config:
Finally, restart sshd:
Make absolutely sure that everything works before disabling password authentication, otherwise you may find yourself without any way to remotely connect to your server.2 Unscheduled trips to the data centre are no fun. (Can you tell I’m writing from experience?)
F. Optional: use a ssh config file
An option to save yourself some typing is to put the server and key details into an ssh config file. On your Mac terminal, create a config file at /Users/username/.ssh/config with the following:
HostName host
User your_username
PubKeyAuthentication yes
IdentityFile ~/.ssh/yourkeyfile_rsa
This will let you login just by typing:
III. Setting up the Transmit FTP client for SSH Key-Based Authentication
After configuring SSH key-based authentication on your server, the SFTP service will start rejecting your login attempts unless you supply your key. Setting up Panic’s Transmit FTP client with key-based authentication is simple but it can be a little buggy.
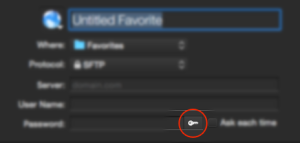
- In Transmit, delete your old connection details and add new connection settings 3
- Leave the password blank
- Either:
- From the menu, select Favourites > Import SSH Key File
- Or click the key picker, which is the key icon to the right of the password box
- Import your private key file yourkeyfile_rsa
Connect with these new settings and the SFTP server will grant you access.
If you try this process with a password-encrypted key, Transmit will give you the error: “The file is not in a supported format.” This is a bug and you’ll have to apply a workaround. Panic’s customer support sent me the following instructions:
If the private key is passphrase encrypted (as yours is), or if it lives in a directory other than ~/.ssh/, there are a few extra steps needed to get up and running.
Instead of using the key picker, edit your ~/.ssh/config file and add the following:
Host yourserver.com
IdentityFile /Users/yourusername/.ssh/id_rsaThen set the site’s Password field to your key’s passphrase and try connecting.
Alternatively, you can try this method:
- First, add the keyfile and password to your keychain:
ssh-add -K path/to/.ssh/yourkeyfile_rsa
- Now add the connection details to Transmit but do not enter the password or set a key file.
- Transmit will connect using the credentials in you keychain
In addition to being able to conveniently log in to your various servers, you will now also be able to use Transmit for your regular web development file transfers.
IV. Notes
-
It’s tempting to think that setting a password for your key negates the whole point of this exercise. After all, if you have to enter a password to authenticate with the key file, you might as well keep the existing model of password authentication to the server, right? Not quite and here’s why: the ssh key is a cryptographically secure way of authenticating to your server and is exactly what you want for something accessible to the open internet. While manually typing in the key itself every time you want to open a connection isn’t practical, SSH key-based authentication handles key exchange automatically.
The key password protects against a different threat. It prevents unauthorised use of the key itself. This has a lower threat profile because it’s stored on your own private workstation. It therefore can be something that’s easier to remember and type.
-
Remember to backup your keys and store the backups in a secure location. If you lose your keys and have also disabled password authentication, you won’t be able to access the server without physical access or help from your hosting technical support.
-
I’ve found that editing a saved connection sometimes doesn’t work. This might be a bug in Transmit. Deleting the old connection and creating a new one seems to always work.