If you’ve run a WordPress site long enough, you’d know how making changes to it can be tricky. Sometimes, even minor changes can cause major glitches. This makes backups and staging such lifesavers!
Every WordPress site should have backup and staging solutions in place. And not just any solution, one that actually works! I say this because in my experience, relying on host backups and staging environments have too many limitations and a tedious process. So I turned to plugins, but there too, I found so many options, it was hard to pick the right one.
In my quest to get a permanent solution, I stumbled upon BlogVault. It was easy-to-use and reliable with a great support team behind it. Ever since, it has been my go-to for WordPress backups and staging.
So today, I’m sharing everything what I think WordPress site owners should know about backups and staging and why BlogVault works best.
Let’s begin with a few basics.
Difference Between Backup and Staging
Many ask If I have a backup, why do I need staging? Well, the two solve very different problems. Backups are for reverting to a previous version when a problem arises on the site.
For example, you run an update on your website and it causes your site to malfunction. You find that plugins are not compatible with the new version of WordPress. It would take considerable time to update these plugins or find replacements. To solve the issue immediately and get your site back to normal, you can restore your backup.
Backups come in handy when things go wrong such as botched updates, human errors, presence of malware, and so on.
Coming to staging, it enables you to create a clone of your WordPress website. This is done specifically for development. You can try out new themes, plugins, designs and layouts. You can test out updates and even test restore your backup! None of the changes you make will affect your live site.
There are staging solutions that have a feature to merge your changes. This is extremely handy because you might make multiple changes and it would take time to replicate the same on your live site. So you can just push the changes to your live site. Simply put, staging enables progress!
Now that you know why you need both solutions, let’s check out the backup solutions available for WordPress sites.
WordPress Backup Solutions
There are many options to backup your WordPress site, but not all of them are easy to use or reliable. The main options available to back up your site are – manually, using a plugin, or through your web host.
Manual Backups
For this, you need to access your web hosting account. Once you’ve logged in, go to cPanel > File Manager > Public_Html. Here, you’ll see all your WordPress files. Simply compress and download them.
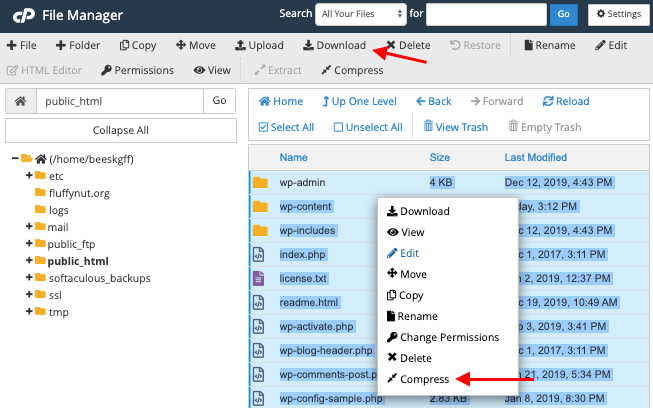
It seems simple enough. But there are issues with this method. For one, the process is time-consuming. Spending time taking manual backups regularly is simply not feasible when you have tons of other things to focus on. Plus, you need to take responsibility to encrypt your data and store the backup locally. A backup has all the information on your website and needs to be stored securely. If hackers get their hands on an unencrypted backup, it’s already a data breach, but you can be sure your site will be hacked as well.
But above all, the biggest hassle with this method is the restoration process. Sometimes, the backup just doesn’t work at all. Other times, you restore your site only to find it malfunctioning or missing functionalities. Which means more time wasted on troubleshooting and debugging troubles. This is why I prefer using a plugin. But among these too, there are so many options available, how do you choose one?
Well, after trying out a couple of them, I stuck with BlogVault. It’s great for backups and even offers inbuilt staging at no additional cost.
Backups with a WordPress Plugin – BlogVault
To start off, setting up BlogVault was easy to use – with a simple install and activate process. Once you sign up, the backup automatically runs. It gives you the following options which I think is not only cool but essential for WordPress:
-
- The option to schedule your backups. Plus, you can take a backup on demand whenever you want, any number of times. This is good to have when you want to make major changes to your site or roll out big updates. Taking a backup before any major change is absolutely necessary.
- It’s all automated so you don’t have to worry about the technicalities.
- The restore process is just a few clicks. It takes a few minutes and it’s guaranteed to work. So you needn’t worry about your site breaking or losing data.
- The process is handled offsite on their own servers so it doesn’t affect the performance or speed of your site. Plus, it doesn’t take a full backup every single time. It smartly copies one full backup and then subsequently, only the changes made each time are backed up.
- Lastly, your backup is encrypted and multiple copies of it are stored securely. That takes away the pain of storage.

Apart from this, there are handy features like 365-day archives, real-time backups, website management, site migrations, multiple site management, uptime monitoring, and staging.
Next, you can also back up your website using your web host itself. I’ve checked out two of the most popular ones.
Backups with your Host – WP Engine
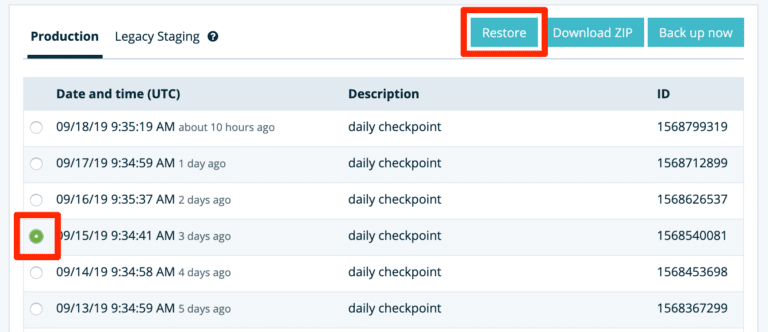
WP Engine takes backups for all environments by default. This includes production staging, development, and legacy staging. It’s automated, encrypted, and stored offsite on Amazon S3. You can also take manual backups. It keeps up to 40 backup points. Older data up to 60 points may be accessible but you need to contact their support team for that.
To access a backup, log into your user portal. Go to sites > environment name > backup points. You’ll find your backups here. You can also create a backup on demand.
To restore, simply click on the backup point you want and click the Restore button.
The process seems simple enough. But WP Engine also has some drawbacks. The restore process can take several minutes to several hours. And it’s important to note that they do not copy all files of your site. The following files aren’t included:
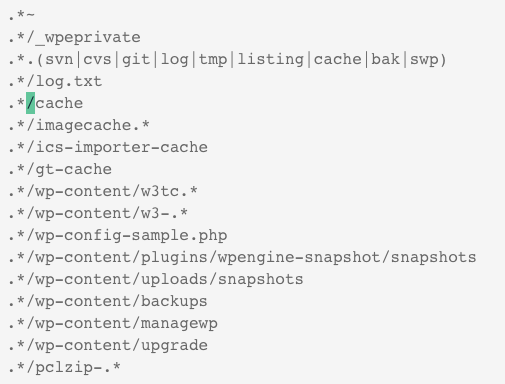
Additionally, it’s a destructive backup which means, during the restoration process, all content is overwritten. So, if you have files on your website that are not present in your backup, they will be wiped out. Your site will be restored to the contents of the backup alone.
Backups with your Host – Kinsta
Kinsta provides daily automatic backups for your WordPress site. It also has system-generated backups for all the sites listed in your account. The backup is a snapshot of your website’s files, database, redirects, and Nginx configuration. When you restore your backup up, all of these elements will be rolled back to when the backup was taken.
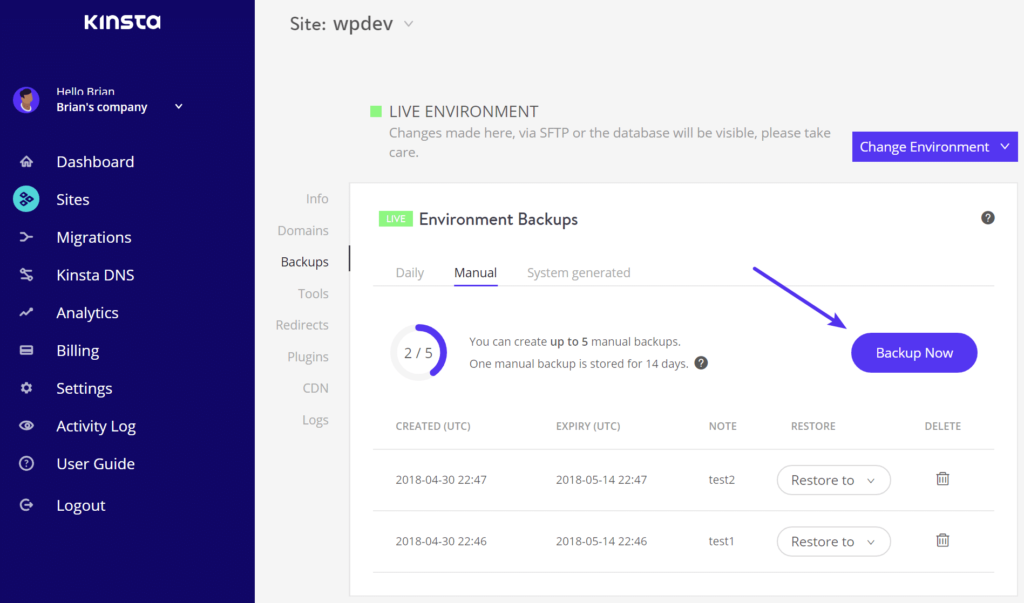
You can also create manual backups if you want one immediately and don’t want to wait for the scheduled one to run. You need to visit the ‘Backups’ tab, click on the ‘Manual’ tab. Here, you’ll find the ‘Backup Now’ button for on-demand backups.
The duration for which your backups are stored depends on your hosting plan. It can vary between 14 days and 30 days. Kinsta also allows you to increase the frequency of your backups to hourly and 6-hour backups at a premium.
When it comes to restoring your site, you can simply click on the ‘Restore’ button next to the backup of your choice. While the restore takes place, you cannot access your site. The process can take a few minutes to a few hours.
What I liked about Kinsta is that it takes a backup of your site before restoration. So you can undo the restore and get back your site to as it was.
That brings up to the end of backups. With a backup solution in place, we can move on to staging. Here, I’ll touch upon – the manual method, show you how you can do this with the BlogVault plugin, and also talk about staging with your hosting provider.
WordPress Staging Solutions
Staging a site can be done manually through your hosting account. But it’s riddled with problems. The process to create one is quite technical, and for a regular WordPress user, it’s not a feasible option.
Next, if you want to merge the changes you made, you need to download the updated files from your staging site and upload them to you live site. This is risky business as you could wipe out data and even crash your site.
Fortunately, there are other options! You can create a staging site with your host or by using a plugin. Coming back to BlogVault, it also offers a staging feature that makes the job much easier.
Staging with BlogVault
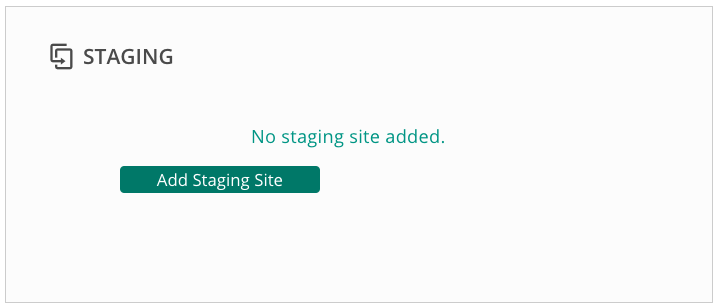
If you’ve already installed BlogVault, staging is a free feature compatible with any web host. On the BlogVault dashboard, you’ll see an option to ‘Add staging site’. It takes a few minutes, and you’ll be notified when it’s done.
The plugin handles migrating your site to a dev environment, so you don’t have to bother about the file transfer and the database export and import. The staging site is password protected and blocked off from search engines so migration does not affect your SEO.
With everything taken care of, you simply need to start using your staging site. Once you’re happy with the changes you’ve made, you can simply merge the changes to your live site. There’s no need to upload files or replicate changes.
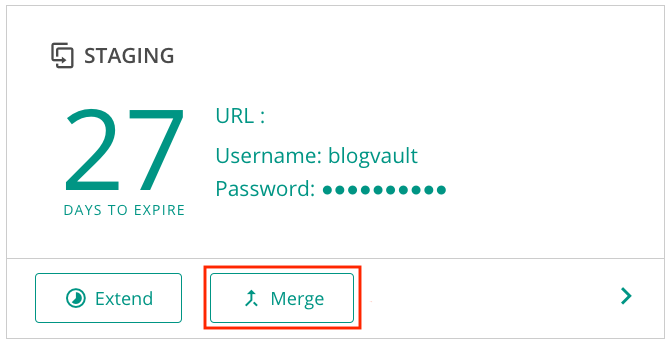
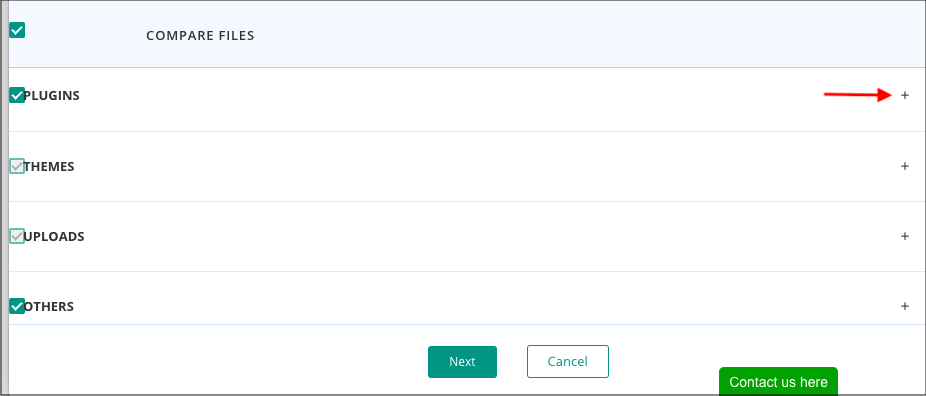
You can also do a selective merge. BlogVault gives you a comparison of your live site and your staging site. You can then select which changes you want to merge to your live site. In the example below, I made changes to my plugins, themes, uploads, and a few other files. But I wanted only the changes made to plugins. By clicking on the ‘+’ sign, I could see the list of plugins I added or modified. I selected the ones I wanted and merged in just two clicks.
The best part is that you can create as many staging sites as you want. So that’s BlogVault. It’s straightforward and easy to use. It won’t break your site when you merge the changes so your site is in safe hands.
Next, let’s take a look at staging options with web hosting providers.
Staging with WP Engine
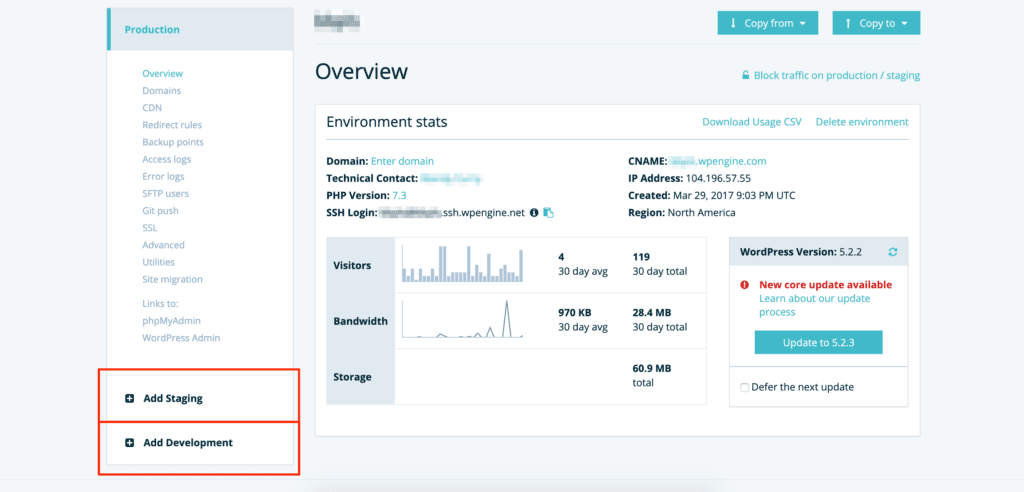
WP Engine gives you options to create three kinds of environments – production, staging, and development.
To carry out the staging process, you first need to add your site to the user portal. Next, log into the user portal and access Sites > Name of your site > Add staging. Your staging site will be created using the backup point of the existing environment.
In case you don’t see the staging option, you need to convert a single environment site into a multi-environment site.
Once you’ve made the changes you want, you can copy the changes from staging to your production environment.
WP Engine also allows you to copy changes from a staging environment of one site to another website. This means you can roll out updates or changes to all your sites without repeating the staging process for each site. However, this can get a bit complicated and isn’t recommended for those new to WordPress.
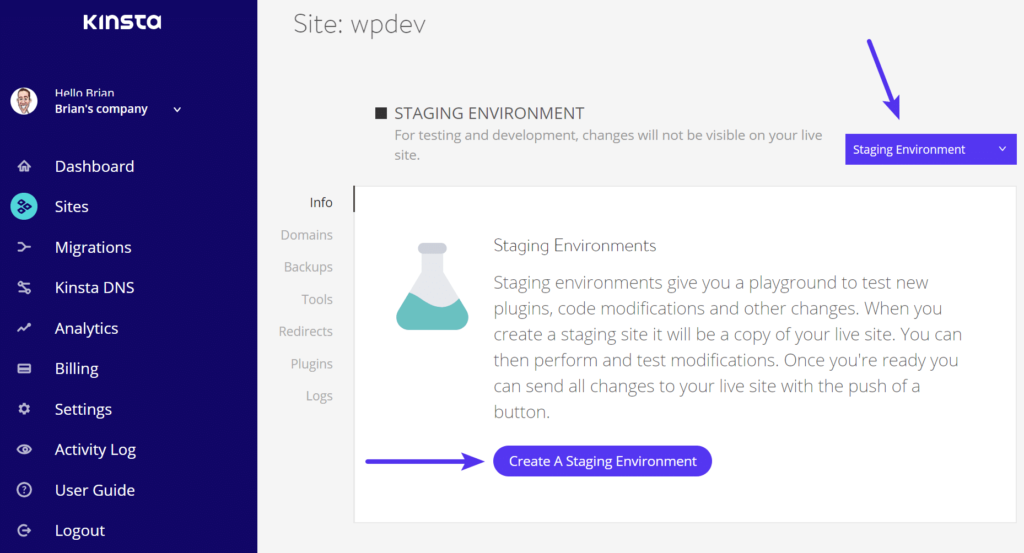
Staging with Kinsta
Creating a staging site with Kinsta is quite easy. Access your Kinsta dashboard and select your site. Here, on the top right, you have the option to create a staging environment for your website. It takes around 10-15 minutes to create a staging site.
Once you refresh the page, you will see your staging details. You can make the changes you like to your staging site and then push them to your production environment. To do this, under the ‘Staging Environment’ tab, there’s a ‘Push Staging to Live’ button. Simply click on it and all the changes will be made visible on your live site.
There’s no selective merge option here. So if you’re pushing changes to live, be aware that all changes will be merged.
Final Thoughts
That’s a wrap on backups and staging for your WordPress site. To summarize, hosts may offer free versions of backup and staging, but you’re limited in terms of features and functionality. As your site grows bigger, you would need to upgrade to premium plans which are quite expensive. However, when you opt for a plugin like BlogVault, it’s reasonably priced, gives you access to premium features, and above all, it works seamlessly.
Whichever be your choice, make sure you can rely on your backup to work and be restored easily. Finally, always carry out changes in a staging environment before updating your live site. This will keep you out of trouble and ensure your site is always up and running.