This WordPress migration guide using the Backup Migration plugin is a non-sponsored guest post by Emma from BackupBliss, creator of the plugin.
You may not have heard of BackupBliss as, it being a relatively new entrant to the backup and migration plugin space, doesn’t appear in the usual ‘top plugins’ style articles. Nevertheless, I have personally used the Backup Migration plugin and find it a good alternative to more familiar names such as All-in-One WP Migration, BlogVault and UpdraftPlus. My standard plugin for many years has been BackUpWordPress, formerly by Human Made and then taken over by XIBO Ltd. Unfortunately, XIBO seems to have abandoned the plugin so I am now looking for a replacement. I am hopeful that BackupBliss may be a contender.
Read on for the main article.
Migrating your WordPress site using the Backup Migration plugin by BackupBliss
Migrating today’s average WordPress site, which has around two dozen plugins and weighs about 1GB, can be a swift task for site owners looking for an easy solution through a plugin. In this article, I will guide you through the steps that will lead you to a successful website migration with the free Backup Migration plugin.
Migration with a plugin usually works flawlessly when done on common hosting providers, and when the website uses up-to-date components such as the latest WordPress and PHP versions, as well as widely used page-builders, themes, and plugins.
However, things might get tricky when in play is outdated software, large databases, highly customized themes, etc. In such cases, and in all other cases where you get stuck with the website migration, I recommend that you turn to a professional.
Preparation
The whole process of WordPress site migration with a Backup Migration plugin basically consists of two parts – backup creation on the old site and backup restoration on the new site (migration). But let’s mention first a couple of things you should do before migration:
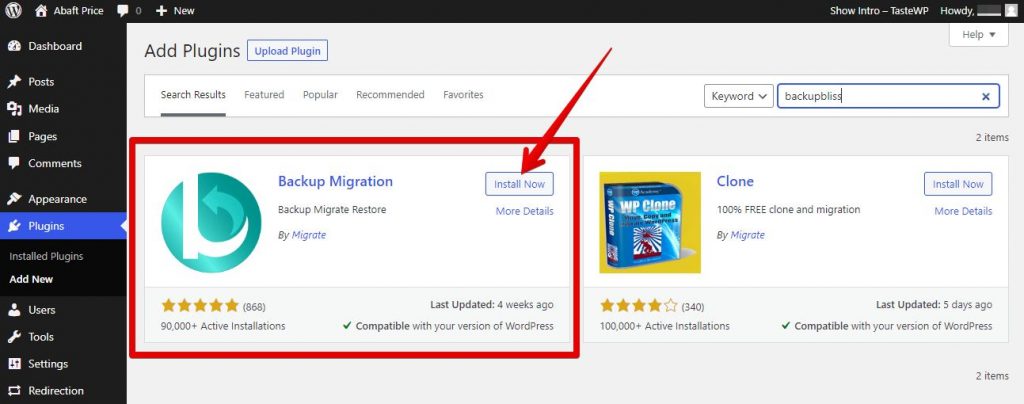
1. Installing the Backup Migration plugin on the old site. You can search for and install it as any other free WP plugin, in the website’s Dashboard section “Plugins”.
2. Setting up a fresh WordPress instance in the place where the new site will be. Most of the big hosting companies have a one-click solution for this, but it is also not too hard to set it up yourself if an automated option is not available to you. You will also need to add a Backup Migration plugin to that instance, the same as on the old site.
3. Excluding unnecessary files from the migration. As a variation of a clean-up, it might be a good time to think about the unused files and plugins that you have on your old site and perhaps add a few exclusion rules when you start creating a website backup in the following chapter.
Backup creation
The website backup is created in a couple of steps:
1. Once you have the Backup Migration plugin installed on your website, it will automatically redirect you to its menu page within the WordPress Dashboard. Navigate to the plugin area “What will be backed up?”, where you should checkmark all files, folders, and complete database, and click on the Save button. This assures that a full site backup will be created.
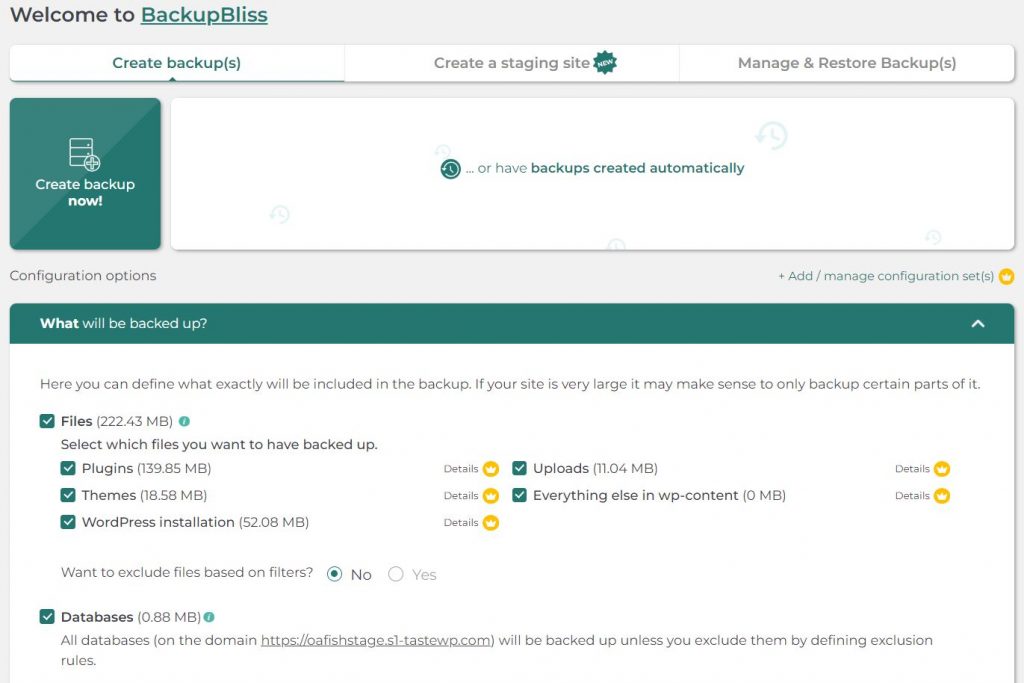
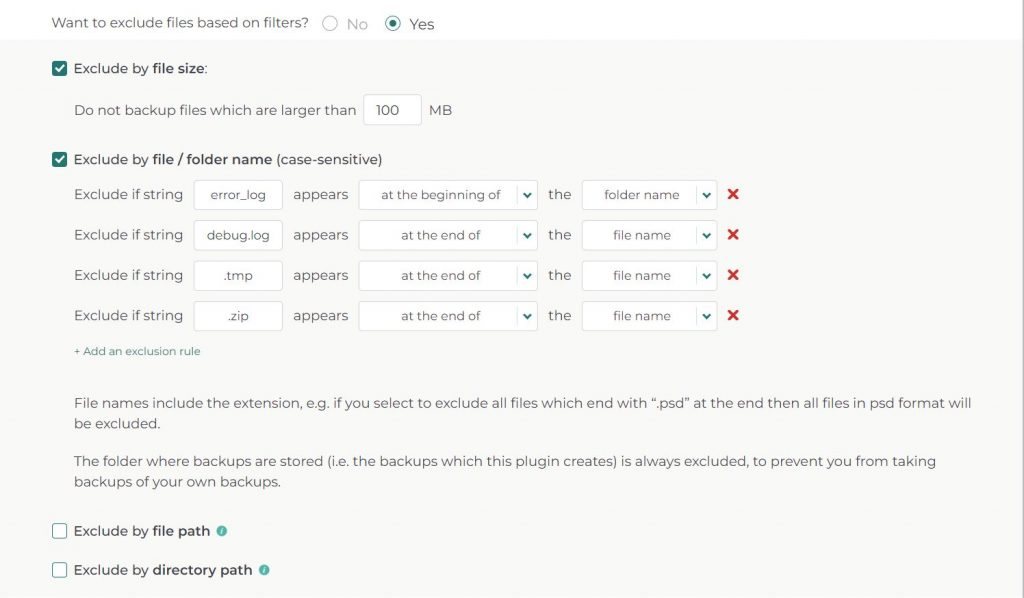
In this menu, you will be able to see the raw sizes of folders and databases that are on your site. It might give you an idea if there is something that you want to exclude. To exclude any specific files and folders, turn on the option for it to “Yes” and carefully compose the list.
By default, this plugin will already suggest some common exclusions, and provide examples on how to make some of your own. Remember to Save these settings if you make any changes.
2. Click the “Create backup now!” button, and the plugin will swiftly commence the backup process, typically wrapping up in just a minute or two for average websites. The duration primarily depends on the database size and server setup. If you’re dealing with larger sites exceeding 2GB, consider the premium Backup Migration plugin for enhanced performance. Once the backup process concludes, you’ll have the option to download the backup file, a highly advisable practice for preserving a local copy of your backup.
Migration job
The second major part, the migration process is taking place on the destination site, which we mentioned in the Preparation section of this article.
Here are the steps to be taken on this site:
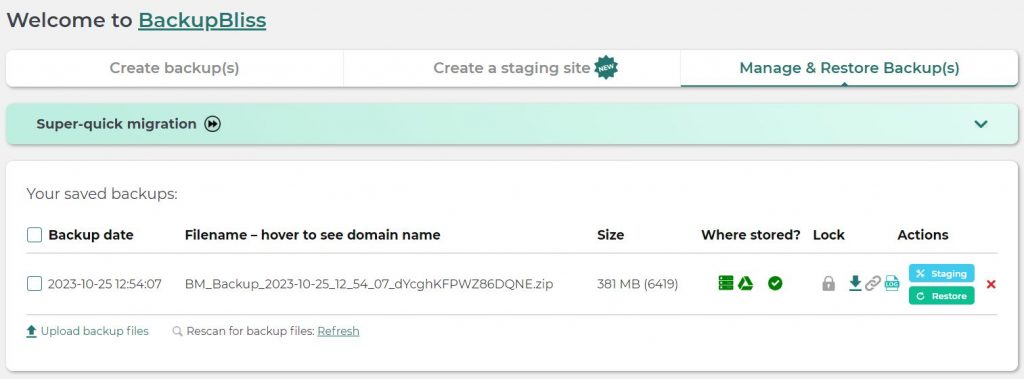
Navigate to the plugin area “Manage & Restore Backup(s)”, where there are three options to restore a backup from the source site. In cases when the site is being moved to a new domain, option A is a fitting choice, and for the cases when domains remain unchanged, then options B or C are more appropriate, as in these cases, site owners will need to take down the source site before making the new website go live
A. Super-Quick Migration: To use this functionality, simply paste the link to the backup file from the source website and click the “Restore Now!” button. You can obtain these backup links in the same plugin section under “Manage & Restore Backup(s)” by clicking the small link icon.
B. Upload Backup Files: To use this option, you can manually upload backup (zip) files within the same plugin section. You have the choice of selecting the file or using a drag-and-drop method. After successfully uploading the backup file, initiate the restoration process by clicking the “Restore” button located on the right side of the listed backup file.
C. External Storage Location: If you prefer to store your backups in an external location, you can select options like Google Drive (others are yet to come). To use this feature and synchronize your backup files across your online websites, connect your Google account in the Backup Migration plugin section titled “Where Shall the Backup(s) Be Stored?”. Once the Google account is connected and the backup file is synchronized, start the restore process by clicking the “Restore” button in the “Manage & Restore Backups” plugin section.
If you have migrated your site with option A, and after you have checked out the new site, you may want to archive the old site. Nevertheless, if you want to want to keep the old site online, it’s typically recommended to configure suitable redirects from the old domain to the new one.
Thankfully, Inisev, a company that developed the Backup Migration plugin, offers a user-friendly Redirection plugin for this purpose, featuring a recognizable intuitive interface that enables a swift and efficient setup of redirections.
Post-migration
Once the migration work is over, you might want to keep the Backup Migration plugin on your new site, for multiple reasons.
The most important one is that you can create regular website backups with it, which can also be scheduled, so you will not have to stress out in case something goes bad on the site and it becomes broken or even unavailable to the users. Though most of the big hosting companies offer the backup option, the solution from the plugin might be a quicker and more user-friendly way to restore your website, especially if you are not a tech-savvy person.
The Backup Migration plugin can also easily create a staging site for you, so the big changes that you plan for your website will not pose a threat to it, as you can test it all out safely on the staging environment.
Final Thoughts
Migrating a WordPress with a plugin can turn out to be a seamless task. However, it has to be kept in mind, that there are tens of thousands of combinations of servers, hosting providers, and WordPress sites and that migration tools are impossible to optimize to do the job flawlessly on each combination. This is just one of the reasons why having top-notch professionals for help is important, and if you are in such need – you know where to contact us.